Springtime Applique Cushion Cover Tutorial
In this tutorial, Katrina is going to show you how to create a box cushion cover - we will be adding an element of spring to the design.
"It reminds me of the flowers that i used to draw as a child. You don’t have to be a great artist you can create any design you want – flowers, birds, bees, butterflies, etc – Just be brave and have fun!" - Katrina
This cushion cover has been made using bonded applique and finished off with a beautiful blanket stitch. This tutorial is an amazing spring craft for kids, and you can use up all your scraps of fabric in the process.
What you need...
- Hand-cut fabric shapes - Katrina chose to make flowers and a butterfly made from a range of grunge fabrics.
- One 16-inch square of fabric - For the background.
- A 2 ½ inch strip of patterned fabric - This is for the boarder of the pillow.
- Bondaweb - To fuse the fabric shapes to the background fabric, you can use any form of bonding agent.
- Sewing Machine (threaded).
- Fabric Scissors.
- Pencil.
- Iron.
Optional:
- Buttons - To create the center of the flower.
- 16-inch square of wadding - To put between fabric and cushion.
How To...
Draw your chosen items onto Bondaweb. Katrina made sure to draw, with a pencil, on the smooth side of the Bondaweb.
A tip if you are going to create a butterfly – partially fold your Bondaweb in half to make sure the butterfly has equal wings.
Cut around your Bondaweb drawing, BUT don’t cut directly on the line (this will become clear later)*.
Stick your Bondaweb shapes onto fabric. The glue (rough) side goes onto the reverse of the fabric and press it with an iron. Then Cut fabric along the line*.


Break the back of the Bondaweb (using a pin) and remove the paper, to reveal the glue.
Place the fabric items onto the background fabric in your desired layout. Katrina created multiple flowers, a stem with leaves and a butterfly.
It is important to have your desired design in the correct place before pressing with the iron.
Make sure to very carefully press it into place with the iron. The heat of the iron attaches your fabric to the background fabric.


Because it’s a cushion you want to make sure the design is stitched down, otherwise the glue will eventually lift in time.
Add a blanket stitch to hold all the items in place.
If you don’t have that option, you can do a zigzag stitch or just hand blanket stitch around to hold the design in place.
With the correct coloured thread, use the edge of your foot to guide the stitch around your items.
Start by putting the needle in the fabric where you want the edge of the stitch to be and very carefully sew around the edge of your design.


Katrina put a little bit of wadding behind the background and to keep the wadding in place, she sewed the buttons through it.
Also, she embroidered the butterflies’ antennas on using two strands of DMC Thread and that went through the wadding layer to hold it in place as well.
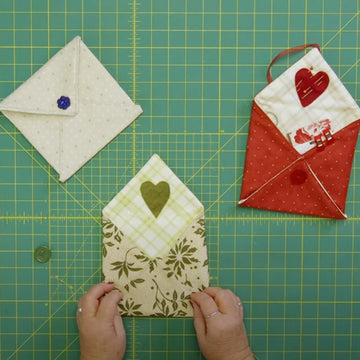
Decorate around the edge of the design with a desired fabric (Katrina chose floral) and finish the cushion off with a simple envelope back.


... and just like that, you have a custom pink spring time cushion.
If you'd prefer a video tutorial of this project, see below!


No comments


0 comments